Automation is all the rage these days and the good news is that when you are working with the Junos OS, you have a plethora of tools at your disposal. This article will provide you with a simple script that uses PyEZ to grab the output of the ‘show bgp summary’ command. After this, we will parse the XML output using jxmlease and then iterate the individual BGP peers to display their characteristics.

Enabling the device for NETCONF.
Using the Junos PyEZ microframework allows you to manage a device running Junos OS via a NETCONF session over SSH. But before this is possible, we need to enable the service on the router. We can do this with the following configuration command:
set system services netconf ssh
After enabling the router for NETCONF, we should not forget to allow the service in the firewall filter that is used to protect the routing engine. By default, the service will be available through TCP port 830. When you examine the system connections after enabling the service, you should see the device listening to port 830:
lab@MX480-00-RE0-baseline> show system connections | match 830
tcp4       0      0  *.830                    *.*                      LISTEN
Determining the RPC
PyEZ offers a cli method that allows us to issue cli commands and scrape the screen. But that is not what we want. What we want to do is have the device return structured data. To get the device to do this, we issue an RPC (Remote Procedure Call). To issue the proper RPC, we first need to find out how we can translate the ‘show bgp summary’ command to an RPC. This is pretty straightforward. We simply log in to a router and add ‘| display xml rpc’ to the cli command that we are interested in:
lab@mx> show bgp summary | display xml rpc
<rpc-reply xmlns:junos="http://xml.juniper.net/junos/16.2R1/junos">
    <rpc>
        <get-bgp-summary-information>
        </get-bgp-summary-information>
    </rpc>
    <cli>
        <banner>{master}</banner>
    </cli>
</rpc-reply>
That’s it. The ‘get-bgp-summary-information’ is the part that is relevant to us. We can easily change this into a format that Python accepts. We replace the hyphens with underscores and add ‘()’ at the end like this: get_bgp_summary_information().
Now that we know the RPC, let's start examining the script.
The script
#!/usr/bin/python3
from jnpr.junos import Device
from lxml import etree
import jxmlease

username='said'
password='password123'

dev = Device(host='10.0.0.135', user=username, password=password, normalize=True)

dev.open()

rpc = dev.rpc.get_bgp_summary_information()
rpc_xml = etree.tostring(rpc, pretty_print=True, encoding='unicode')
dev.close()

print(rpc_xml)

xmlparser = jxmlease.Parser()
result = jxmlease.parse(rpc_xml)

print(result)

for neighbor in result['bgp-information']['bgp-peer']:
    print('Checking peer with IP address: ' + neighbor['peer-address'])
    print(neighbor['peer-as'])
    print(neighbor['peer-state'])
    print(neighbor['elapsed-time'])

for neighbor in result.find_nodes_with_tag('bgp-peer'):
    print('Checking peer with IP address: ' + neighbor['peer-address'])
    print(neighbor['peer-as'])
    print(neighbor['peer-state'])
    print(neighbor['elapsed-time'])
Let’s go over each section and see what is going on. The first thing we see is a shebang:
#!/usr/bin/python3
This line will indicates what interpreter Linux should use. A Windows machine will simply ignore this statement.
After this, we encounter the imports. This example script imports three different modules:
from jnpr.junos import Device
from lxml import etree
import jxmlease
After importing the modules, we set the username and password variable:
username='said'
password='password123'
The username and password were set like this to make for an easy example. I suggest you look into a module called ‘getpass’ or use something else to protect your login credentials.
Next up is specifying the connection:
dev = Device(host='10.0.0.135', user=username, password=password, normalize=True)
After instantiating ‘dev’, we call the open method to open a connection to the device:
dev.open()
After opening a connection to the device, the script issues the RPC. Using etree, we place the result into a string. This string is stored in a variable called ‘rpc_xml’:
rpc = dev.rpc.get_bgp_summary_information()
rpc_xml = etree.tostring(rpc, pretty_print=True, encoding='unicode')
We are done getting the information, so we close the session we have with the device:
dev.close()
We have a look at the string we placed into the ‘rpc_xml’ variable. This is rather useless, but the point here is to examine the output before we use jxmlease to parse it:
print(rpc_xml)
The output would look something like this:
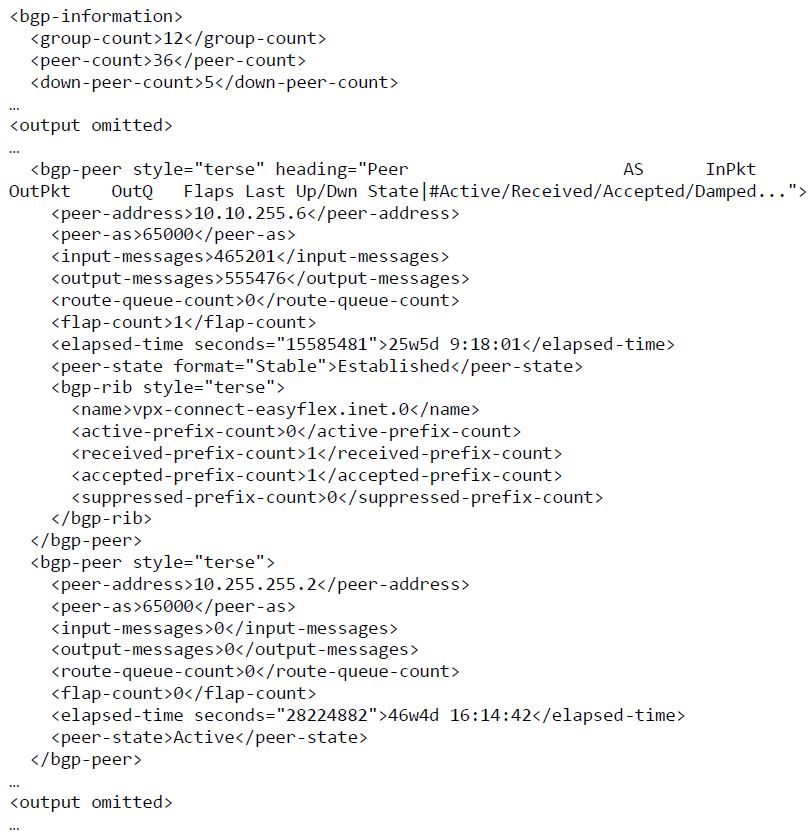
Looks like XML to me! Now, we parse the XML string and place the resulting jxmlease object in a variable called result:
xmlparser = jxmlease.Parser()
result = jxmlease.parse(rpc_xml)
After parsing the XML, we print the result:
print(result)
This would look something like this:

This output is a lot more dictionary-like.
We could iterate this dictionary in the way we would iterate the keys of any Python dictionary. In this example script, we iterate the output at the peer level and access the values that we find interesting. This is done with the following piece of code:
for neighbor in result['bgp-information']['bgp-peer']:
    print('Checking peer with IP address: ' + neighbor['peer-address'])
    print(neighbor['peer-as'])
    print(neighbor['peer-state'])
    print(neighbor['elapsed-time'])
This code will print the IP, the AS, the peer state and the amount of time that the peer is in that state. When I ran the script, the output of this part of the code was as follows:
Checking peer with IP address: 10.10.255.6
65000
Established
25w5d 9:18:01

Checking peer with IP address: 10.255.255.2
65000
Active
46w4d 16:14:42
Instead of iterating the keys, we can also use the jxmlease ‘find_nodes_with_tag’ method to iterate over whatever we want. In the example script, we iterate the ‘bgp-peer’ again:
for neighbor in result.find_nodes_with_tag('bgp-peer'):
    print('Checking peer with IP address: ' + neighbor['peer-address'])
    print(neighbor['peer-as'])
    print(neighbor['peer-state'])
    print(neighbor['elapsed-time'])
The main idea was to show you different ways on how to iterate the output. This part of the code generates exactly the same output as the previous part of the code:
Checking peer with IP address: 10.10.255.6
65000
Established
25w5d 9:18:01

Checking peer with IP address: 10.255.255.2
65000
Active
46w4d 16:14:42
We just used a for loop and printed some facts about the BGP sessions, woohoo! Even though that is already pretty neat, it is easy to add some additional logic to the program. Really, all you need is just a little bit of flow control and some additional familiarity with Python. For instance, if you only wanted to print the BGP peers that are not in the ‘Established’ state, you could consider the following:
for neighbor in result.find_nodes_with_tag('bgp-peer'):
    if neighbor['peer-state'] != 'Established':
To understand more about flow control, and to get some extra insight into what is possible with Python, I recommend the following book:
The book does not offer you any networking related examples, but it is amazing at explaining the basics of the Python programming language. I think Al Sweigart has done a fantastic job explaining things, even to those with little or no programming experience (me included).
Another thing worth looking into is the Junos PyEZ Developer Guide. It is a pretty comprehensive guide that will show you how to use PyEZ.

Connecting to a Juniper device and parsing structured data is not that hard. My goal was to explain to you how to map a CLI command to an RPC and to walk you through a simple example script. Hopefully, you will be able to use this article as a reference and start doing some automation of your own.
Many thanks to Ben Dale for proofreading this post!
